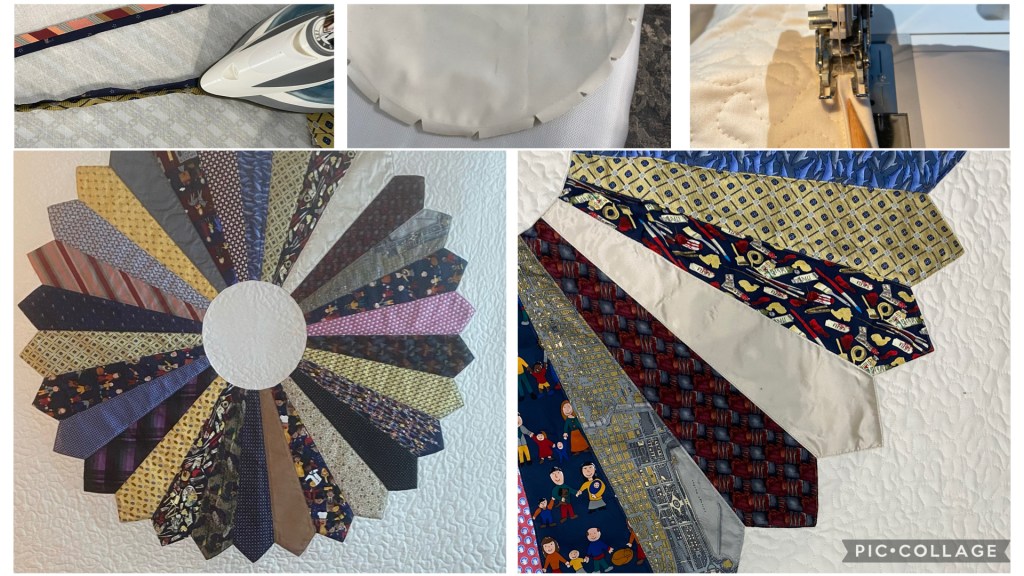
• How I Made A Necktie Quilt Wall Hanging

    (Advanced-Beginner Friendly)

    Some projects are more than just projects.

    This tie quilt is one of them.

    When my mom suggested turning my dad’s ties into a quilt for his retirement, I loved the idea immediately! This quilt was made for my dad’s retirement after decades of work in medicine—as a physician (he is also an author, inventor, and artist!). For decades, he wore a suit and tie to work every single day. Many of those ties were gifts from my mom, tied to milestones, celebrations, and moments that mattered.

    Instead of letting those ties sit in a closet, my mom had a beautiful idea: turn them into something to see, appreciate, and hold onto.

    This tie quilt became a way to stitch together memories—and I’m going to walk you through how to make one of your own.

    Whether you’re creating a sentimental gift or just love meaningful sewing projects, this tutorial is designed to be advanced-beginner-friendly and totally achievable—even if you’ve never made a quilt before (I hadn’t either!). I have been sewing for many years, but this was new territory.

    This post is written in gratitude and appreciation for my parents. They are the best and I thank them for encouraging me every day to do something that matters.


    Why Make a Tie Quilt?

    A tie quilt is more than a sewing project—it’s storytelling.

    It’s a way to:

    • Preserve meaningful clothing
    • Create a one-of-a-kind handmade gift
    • Reuse materials with purpose
    • Turn memories into something tangible
    • Make a project that blends creativity + storytelling

    And yes—it’s also a little intimidating at first. I was terrified to start, convinced that I would destroy my dad’s ties. Some were rare, expensive, and completely irreplaceable.

    So if you’re feeling nervous—you’re not alone. I promise, you can do this.


    I created a Template that you can purchase!

    If you want to try this project, I highly suggest this template. I searched relentlessly trying to find the right size and shape dresden plate. None of them were exactly what I wanted in order to make the ties still look like the original shape of a tie. I decided to use my design skills to create my own that was exactly what I wanted. I am happily producing the acrylic cutting templates so that you can make this project too!

    Kit includes:

    • Tie Template A and Tie Template B
    • 1 template for cutting fusible webbing
    • 1 center circle cutting template
    • PDF of instructions and full materials list with links

    The Tie Quilt Template Set is available for purchase in my Etsy shop.


    Materials

    Purchase the template set on Etsy and I will send you a PDF with more materials, details, and links to the products that I used:

    • Necktie Quilt Template Set – purchase here
    • ~30 neckties (you can duplicate if needed, ties typically have enough material to cut 2)
    • Stabilizer
    • Fusible web
    • Main fabric and Backing fabric
    • Batting
    • Basting spray
    • Fabric marking pen or chalk
    • Point turner tool
    • Large workspace (floor totally works!)

    Optional, but highly recommended:

    • Long-arm quilting service
      • I searched for a local quilting shop that had a longarm quilting service.
      • Jenn’s Longarming outside of Pittsburgh, PA was fabulous! If you can’t find one near where you live, there are services that you can ship to. I recommend talking to the longarming service first to understand their specifications.

    Phase 1: Practice and Order Samples

    I recommend practicing. I did this quite a bit before I started working on the good ties. You can practice seam ripping, cutting and stabilizing ties, and the stitches with the thread that you intend to use on 2nd hand practice ties, especially if you have irreplaceable ties like I did.

    💡 Tip 1: Purchase some 2nd-hand neckties and practice to your heart’s content until you are confident with the method.

    💡 Tip 2: Order samples of your fabric/batting. It helped me to decide which fabric I wanted to use before I ordered my project quantity.


    Phase 2: Prepare the Ties

    Preparation is the most time-intensive step in this project—and one of the most important.

    Each tie is constructed differently, often on the bias and with delicate fabric, so stabilizing and flattening them properly will make everything easier and look better later.

    1. Deconstruct the ties
      • Use a seam ripper to open the back seam so the tie lays flat and is a single layer of fabric. If the pointed tip is in good shape, you can keep it intact
      • Cut away any loose stabilizer fabric that was added to the tie (sometimes tie-makers do this so that it is not floppy. If the stabilizer is loose and seems unnecessary, feel free to remove it.
      • Otherwise, fully open and reconstruct later
    2. Press gently and thoroughly
      • Take your time—wrinkles and folds will affect your cuts and prevent it from laying flat.
    3. Apply the fusible stabilizer
      • After each tie is a single layer of fabric, you can either add the stabilizer before you cut, or you can use the templates to cut the stabilizer separately and add it later. I did both methods depending on the tie material and if it seemed stable enough to cut straight. Most of the silk ties were very floppy, so I chose to apply the stabilizer first and then cut the piece. Follow the stabilizer instructions to adhere.
    4. Cut using the templates
      • Trace first, then cut carefully for accuracy.
      • Use Tie Template A for any ties that you are preserving the pointy end.
      • Use Tie Template B for any ties that you are duplicating or cannot preserve the pointy end.
      • Alternatively, if you feel confident using a rotary cutter, you can do that using my acrylic templates. I was worried that the template would slip, so I traced with my disappearing ink pen and then cut with my good fabric scissors.
    5. Prepare duplicates or ties that you had to open the pointy part:
      • If you fully opened your ties when taking them apart or are cutting a second piece for a duplicate:
      • Recreate the pointed ends by the following method: Use Tie Template B to cut the piece and the stabilizer. Adhere the stabilizer to the wrong side. Fold the wide end length-wise with right sides together and stitch along the edge with a 3/8″ seam. Clip the corner so that you can remove the bulk before turning it. Flip the right side out and push out the point with the point turner tool. Gently iron to press flat. Now, you have a piece that looks just like the rest of the ties!

    💡 Tip: If you’re new to working with slippery fabric, test your stabilizer and pressing settings on a scrap first.


    Phase 3: Prepare the Center Circle

    This piece covers the inner raw edges where the ties meet.

    Steps:

    1. Cut 2 circles using the Center Circle Template from whatever fabric you would like as the center circle. I used the same fabric as the main and backing fabric.
    2. Place the two center circle pieces right sides together. Sew the two pieces together along the outer edge with a ⅜” seam allowance, leaving a 2” opening
    3. Clip v-shapes along the seam for a smooth edge when you turn the circle
    4. Turn right side out and use the point turner to make sure that the seam lays flat, then, press to lay flat
    5. Optional: I used a small piece of the double-sided webbing inside the circle so that the two pieces didn’t shift. I pressed it so that the two pieces adhered to each other.
    6. Set aside until step 9

    Step 1

    Step 2

    Step 3


    Phase 4: Cut and Prep Your Fabric

    Suggested sizing:

    • Main fabric: ~65” x 65”
    • Backing fabric: ~75” x 75”
    • Binding strips: 2.5” wide and ~280 inches long pieced together

    At the end, I ended up cutting the entire quilt down a bit smaller for straightening edges and overall appearance, but I wanted to have extra space around the ties to make sure that I had enough room to trim it down. The final dimensions were approximately 60″x60″

    💡 Tip: Check with your longarming service to determine the correct dimensions for topper and backing fabric. Many longarmers require that the backing fabric is larger than the topper in order to maneuver it in the machine.

    Prep steps:

    • Prewash and press the main, backing, and binding fabric (I did not wash the ties)
    • This is where a large work area is really helpful
    • Measure and cut your main fabric
    • Measure and cut backing fabric

    Binding:

    • Cut long 2.5” strips
    • Join into one continuous strip (~280”) using a diagonal or mitered seam
    • Fold in half lengthwise and press

    You can also use the longarming service to bind your quilt. I didn’t do that on this piece, but could do that on a future project.

    💡 Tip 1: I used a piece of cardboard to wind the prepared binding strip to keep it tidy. It really helped to keep everything organized.

    💡 Tip 2: I watched a lot of tutorials on how to bind a quilt before I actually did it. I suggest doing that if you have never applied binding before. She Sews Seams has a great tutorial.


    Phase 5: Plan Your Layout

    Lay out your tie pieces in a full circle before sewing.

    This step is part design, part problem-solving.

    Consider:

    • Color balance around the circle
    • Distribution of bold vs subtle patterns
    • Avoiding repetition in adjacent pieces

    Take a step back occasionally—what looks good up close can feel different from a distance.


    Phase 6: Sew the Tie Circle

    Instead of sewing everything in one large circle, work in sections.

    Process:

    1. Sew ties together into quarters of the circle
    2. Place 2 ties right sides together and sew down the long edge with a 3/8″ seam allowance
    3. After sewing, unfold and finger press open the seams.
    4. Continue adding ties in the same manner until you have a quarter of the circle completed.
    5. Press seams open with iron to reduce bulk and lay flat
    6. Join the 4 sections together by placing right sides together and sewing along long edge to complete the circle and then press those seams open

    💡 Tip: Accuracy matters here—small inconsistencies can add up when forming a full circle.

    💡 Tip: Make sure all seams are pressed open so that the tie circle lays flat.

    Step 1

    Step 2

    Step 3

    Step 4


    Phase 7: Attach the Tie Circle to the Background Fabric

    This is where the quilt top really comes together.

    Attach tie circle and Sew on long seams of Tie Circle – Stitch in the Ditch

    1. Find and mark the center of your main fabric. I folded the main fabric piece in half and made a mark with a disappearing ink pen, then I did the same in the other direction. Since you will have extra fabric on all sides, if you are a little off, you can always correct it by trimming once it is quilted.
      • Tip: If you are using a heat erasable or vaporizing pen, use in an inconspicuous area or one that you will be covering because if exposed to cold temperatures, lines can re-appear. Test pen on a scrap piece of fabric first.
    2. Cut the double-sided fusible web for each tie with the template provided. Place them on the wrong side of each tie to stick it in place. Before you press, you can reposition as much as you like. Make sure that the main fabric is smooth and there are no folds or wrinkles when you place the tie circle.
    3. Position the tie circle so that it is centered.
    4. Once you are completely satisfied with the placement, press to adhere
    5. Stitching: Use invisible thread or a very fine matching thread and stitch in the ditch along the long seams in between each tie.

    Phase 8: Make the Quilt Sandwich

    Layer your quilt:

    1. Backing (right side down)
    2. Batting
    3. Quilt top (right side up)
    4. Use basting spray between each layer to ensure that it doesn’t shift. Follow directions on basting spray.

    Secure with basting spray or pins, smoothing as you go to avoid shifting.

    💡 Note: I wanted the tie circle to be sewn through onto the backing so that there wouldn’t be any gaping. This made it a little more difficult to sew moving forward because it was through multiple layers. I am glad that I sandwiched before edge stitching the tie circle because I think it made the whole quilt more secure and it made the back of the quilt look better.

    Stitching:
    1. Now that you have your sandwich, you can edge stitch on the tie circle. I stitched approximately ⅛” on each side of the long seams and ⅛” along each of the pointed edges. I used the invisible thread for the spool (top thread) and I used the thread that matched the backing fabric for the bobbin.
    2. I used an edging foot to make sure that my stitches were a consistent distance from the edge.

    💡 Tip: Go slowly—this step involves multiple fabric layers and varying textures.


    Phase 9: Add the Center Circle

    This piece covers the inner raw edges where the ties meet.

    Steps:

    1. Cut a smaller circle of double sided webbing and place it on one side of the circle.
    2. Position the center circle so that it is centered and covering all of the raw edges of the middle part of the tie circle.
    3. Once you are happy with the placement, press to adhere the center circle.
    4. Finally, edge stitch the center circle all the way around. Use an edging foot to stitch a consistent and tight to the edge seam, again a 1/8″ seam.

    This detail gives the quilt a clean, finished look.


    Phase 10: Quilting – Using a Longarm Quilting Service

    Longarm quilting uses an industrial size machine to stitch together your quilt sandwich. It can give your project a professional finish. Benefits are a detailed beautiful finish, amazing designs, huge time savings, save yourself frustration from wrestling with your quilt, and save the wear and tear on your home machine.

    Because this quilt includes many seams and fabric types, quilting can be a bit more complex. I asked Jenn to not stitch on top of the ties. She stitched as close as she could get to the tie circle, and did an amazing job!

    There are many longarm quilting services and I suggest searching your local area to see if there is a quilting shop that provides this service. If you don’t have one nearby, there are many that allow you to send your pieces by mail.


    Phase 11: Binding

    Once you have your quilted piece, now it is time to bind. This is one of the details that can make it look really finished and professional. 

    1. Trim excess batting and backing so that everything is flush and even
    2. Grab your cardboard spool of binding materials that you cut at the beginning.
    3. Attach your binding. I’ll be honest—I learned this from video tutorials, and I recommend you do the same. It’s one of those skills that’s easier to see than read. She Sews Seams has a terrific, easy to follow step-by-step tutorial. She uses the hand-stitching method at the end, but I did it on my machine. I am not a big fan of hand-stitching, so I just went slowly to make sure that everything was lined up correctly.

    💡 Tip: if you use the exact color of your main fabric, the stitches should blend in nicely

    If you’re newer to binding:

    • Use a method you’re comfortable with (machine or hand finish)
    • Take your time at the corners for clean edges
    • Practice on a scrap first

    Lessons Learned

    • Practice helps with confidence
    • Stabilizer is essential for consistency
    • Pressing frequently improves accuracy
    • Measure carefully multiple times before cutting or sewing
    • Invisible thread requires tension adjustments—test first
    • Give yourself time—this is a detailed project

    A Quilt That Tells a Story

    When I finished this quilt, it felt different from other projects.

    It wasn’t just about whether it turned out well—it was about what it represented.

    Each tie held a memory, and now those memories are part of something new. Something visible. Something special.


    Final Thoughts

    If you’re an experienced beginner looking for a meaningful project that builds your skills, this is a beautiful place to start.

    If you try this project, I would love to hear about your experience and see pictures! Leave a comment below! If you have any questions, feel free to reach out as well!

    Take your time. Stay organized. Trust the process.

    And most importantly—make something that matters. 💛


    Bonus

    Leftover materials are full of possibilities! I was able to make some matching pillows using the same method, but just a quarter of the tie circle. I added a zipper and some corded binding. Stay tuned for more!


    Copyright © 2026 Fusion Creative LLC. All rights reserved.

    Love this project? Feel free to share a link to this post with fellow makers! Please do not copy tutorials, templates, or photos without permission. Your support helps me continue creating free content, tutorials, and resources for the maker community. 💛

    No comments to show.

  • Welcome to the Maker Life: Creating with Heart and Curiosity

    If you’ve ever lost track of time in the middle of a project, stayed up too late “just finishing one more thing,” or tried a new craft simply because you had to know how it worked—you’re in the right place.

    I’ve loved arts and crafts for as long as I can remember. Some of my earliest creative memories are learning to knit and sew from my mom, watching yarn and fabric transform into something useful and beautiful right in my hands. Crafting became a constant companion—something I returned to again and again for comfort, creativity, and joy.

    Over the years, I’ve explored countless creative mediums: paper arts, fiber arts like knitting and crochet, yarn dyeing, sewing, graphic design, screen printing, beading, quilting, painting, sublimation, laser cutting, paper making, soap-making, candle-making, basic woodworking—and more. Some projects turn out exactly as I imagined. Others… definitely do not. 😅

    I’m not an expert, and I didn’t go to school for an art degree. I simply love making things and learning as much as possible through research, trial, and error. Every project is made with heart, curiosity, and passion—and that’s what this blog is about.

    How This Maker Blog Began

    During the pandemic, while caring for my newborn daughter, creativity became more than a hobby—it became a lifeline. I left my job in higher education and started a small creative business from home, beginning with sewing zipper pouches and face masks (thank you, Covid-19). It eventually evolved into designing greeting cards and gifts (Oak & Arbor), along with personalized items for my daughter’s bedroom. What started as a way to cope, create, and contribute grew into something bigger: a deep connection to the maker movement and the belief that creativity isn’t just a hobby—it’s a way of life.

    What You’ll Find Here

    This is a blog for makers, crafters, and curious creatives of all skill levels. I’ll share:

    • Project ideas across many mediums
    • Tips, tricks, and lessons learned (including what not to do)
    • Beginner-friendly guidance for trying new crafts without fear
    • Honest reflections on creative flops and successes
    • Tools, materials, and process breakdowns
    • Encouragement to experiment, even when perfection isn’t guaranteed

    Why Making is More Than Just Making

    In my experience, making goes beyond the project. Crafting can quiet the noise in our heads, help us live more sustainably, connect us to communities of people, and give us a way to speak up for what matters. It’s not just about what we make—it’s about how making changes us and the world around us. Let’s explore some of these themes.

    Sustainable Crafting and DIY with Purpose

    Another reason I love crafting is the freedom it gives us to be more intentional with what we use and how we consume. Making things by hand opens the door to reusing materials, repurposing what we already have, and repairing instead of replacing—small choices that add up in meaningful ways. When we create our own goods, we save money, learn valuable skills, and step outside the cycle of endlessly buying mass-produced products that often lack care or longevity. Crafting encourages us to slow down, value quality over convenience, and take pride in objects that are made thoughtfully and built to last.

    Crafting and Mental Health

    Creativity isn’t just about making things—it’s about how making things makes us feel.

    Crafting has always been a grounding force in my life. It quiets the noise, reduces stress, and brings a sense of accomplishment in a world that often feels chaotic. There’s something powerful about creating with your hands: it helps you focus on process, practice self-expression, and be fully present.

    This blog will also explore the connection between crafting and well-being, and why making—especially imperfect making—matters. I’m looking forward to digging into the research and sharing what I discover.

    The Maker Movement and Civic Engagement

    I’m inspired by the maker movement’s connection to activism—how creativity can be a quiet (and sometimes not-so-quiet) form of resistance. Projects like the Melt ICE hat demonstrate how something as classic as knitting can carry a powerful message, turning handmade objects into visible statements of care, protest, and solidarity. Button making has long been a grassroots staple—quick to produce, easy to share, and deeply personal—helping people respond to social issues and make their voices seen in everyday spaces. In these moments, making becomes more than a creative outlet; it becomes a way to participate, speak up, and use our hands to reflect our values.

    Why the Maker Movement Matters

    The maker movement is about more than DIY projects. It’s about curiosity, resilience, learning by doing, being part of a creative community, and reclaiming creativity in a digital, fast-paced world. It’s about trying something new, failing, adjusting, and trying again.

    Whether you’re here to learn a new skill, find inspiration, or simply feel less alone in your creative journey—I’m so glad you’re here.

    Let’s Make Things Together

    The goal of this blog is simple: to inspire, create, and connect.

    So grab your supplies, make a little mess, and don’t worry if it’s not perfect. Some of the best things start that way.

    Welcome to the maker life. ✂️🧶🎨